

How To Do A Feather Edge In Photoshop
For beginners, learning how to plume in Photoshop may seem similar a hard job at offset. Just at that place is nothing to worry about. If you follow this tutorial, you will larn how to create a feathering upshot like a pro in a curt fourth dimension.
Feathering can come in quite handy if you desire to make edges smoother or create a blurring consequence. It can be useful when you are putting two images together or creating a nice vignette. This consequence tin can also help you make stunning illustrations.
To learn something every bit unproblematic as to create shine edges can take y'all a long way. It can improve your photograph editing skills. With a blurring effect in Photoshop, you tin even remove crowds in front of a landmark and make it stand out.
Nosotros accept compiled the perfect guide to help y'all go started with photoshop feather edges. Beginners can larn how to brand smoothen edges in Photoshop with the assist of this step-past-stride guide. It tin can give yous the confidence to make complex designs and ameliorate your skills as a designer.
So, let's begin our tutorial. Showtime, let'southward take a expect at what feathering actually ways in Photoshop.
How to Smooth Edges or Feather Edges in Photoshop
In Photoshop, softening the edges is termed "feathering". This is a unique effect that gives a smoother appearance to your designs. It can make the transitions in your image look refined and soften a option.
Whether you are trying to select a portion of your paradigm, or you want to highlight a function, feathering can go far easier. It is peculiarly useful when merging two images. It can remove difficult edges and make your image look more than natural.
The process of getting refine edges in Photoshop is very unproblematic. It would take you a little practice to grasp how to feather in Photoshop. Once you go the hang of it you lot will be creating a plume outline of images and selections in Photoshop like a professional photograph editor.
How to Feather in Photoshop?
Now that we know what a feather effect is, allow'due south take a look at how to mistiness an image in Photoshop. This procedure is quite uncomplicated. If you are a beginner you can follow our step-by-step guide to get started.
Photoshop provides a Feather command in the Select menu pick. (Select-> Change-> Feather). But there is a drawback of using this command directly over a selection. It does non permit y'all to preview how the final result volition look.
Scout this VIDEO tutorial –
There is a longer, but better style to achieve this. Information technology will give you greater control over how your final design volition look like. Let'southward look at the process in more than particular. Follow the steps beneath if you lot want to learn how to feather in Photoshop.
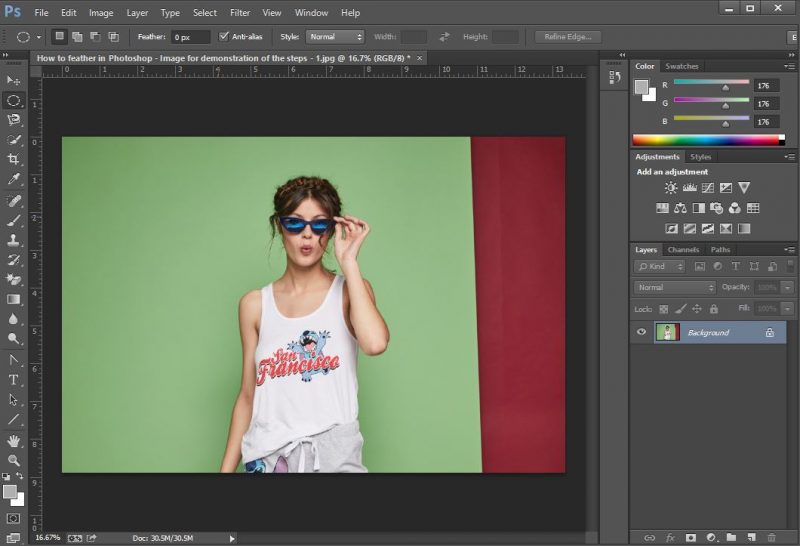
Step 1: Open the image
The get-go thing to do after you open the Photoshop application is to open up your image. This image would exist placed on the groundwork layer and your sail size will fix co-ordinate to the size of the image.
Once the image is opened in Photoshop, you are now set to perform other deportment on information technology, such as cropping and selecting portions of it. You lot are ready to larn how to feather in Photoshop.
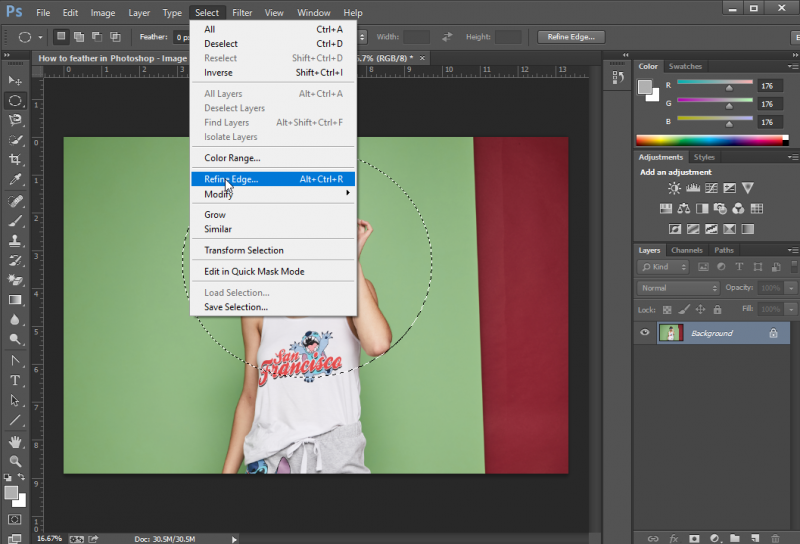
Step 2: Make a Selection
Photoshop offers diverse tools for selecting a portion of an paradigm. In that location are the usual marquee tools, and then more advanced lasso tools. Depending on the shape of your choice, y'all can pick the tool that fits your needs.
Brand a option over your image and it will appear as a dotted line on the image. Photoshop makes it quite piece of cake for the users to see the portion they take selected.
You tin can click on 'Deselect' in the Select menu to make another pick.

Step 3: Feather Your Selection
Now comes the nigh important office. We are going to see how to plume in Photoshop. Feathering your selection makes the edges softer. It is especially useful when y'all want to have a portion of the prototype and add it to another image.
One time yous have made your selection go to the Select menu and find the option that says 'Refine Edges'. If y'all desire to sympathise how to smooth edges in Photoshop, this is the best mode to do it. You will be able to preview the consequence before you apply the effect.
When you click on Refine Edges, a new card will appear and you will enter into preview manner.
There are a lot of options, but nosotros are simply interested in the toggle that reads 'Feather'. As you modify the value of Feather, you will be able to see the results in the frame.
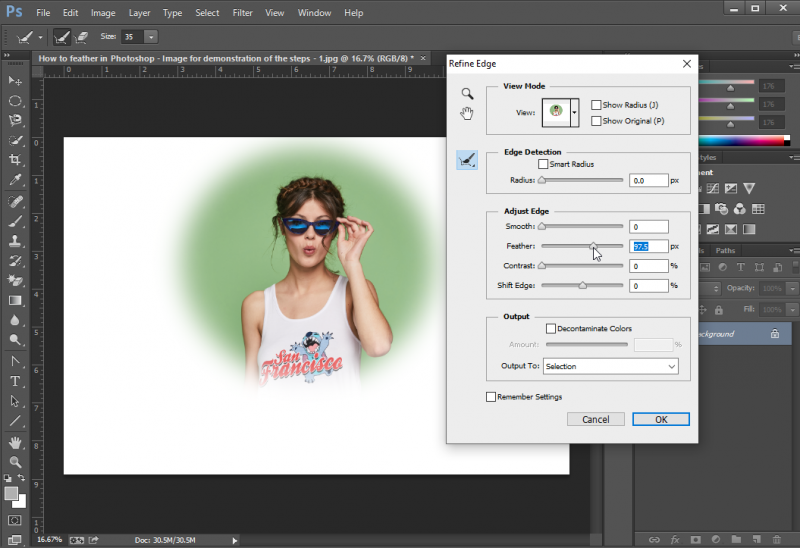
An of import thing to remember is, the college the plumage value, the more blurred the edges will be. Keep the Plume value moderate for the best results.
If it is as well depression the edges on your selection will not soften. If it is besides high, your unabridged selection tin look blurred.
Click on 'Ok' to apply the changes to the option.

After y'all click Ok, the feather effect as it was apparent in the preview manner will disappear on the screen. You volition only be able to run across the option of the whole image, the same way as earlier you lot applied a feather effect on it.
At that place is nothing to worry about, next steps would make it clear how to view the feather outline on your option.
Pace 4: Copy the Selected Portion to another Layer
Now that you accept practical the Plumage effect on your choice, you lot are gratis to copy or cut the selection out of the main epitome. Yous tin identify information technology on another paradigm or simply place information technology over a coloured layer.
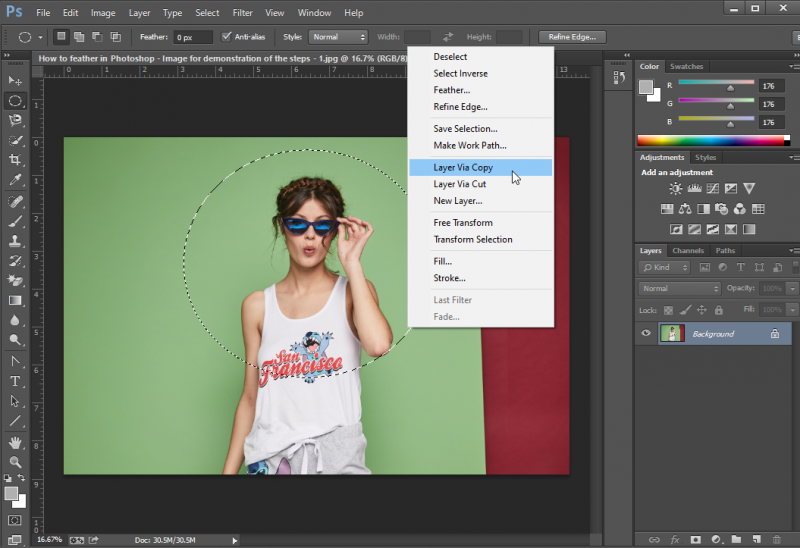
Right-click on the border of your selection to open up a carte. Click on " Layer via Copy ". Immediately yous will find that a new layer will appear in the Layer Panel.
You tin also use "Ctrl+C" to copy the choice, create a new layer, and use "Ctrl+V" to paste it.
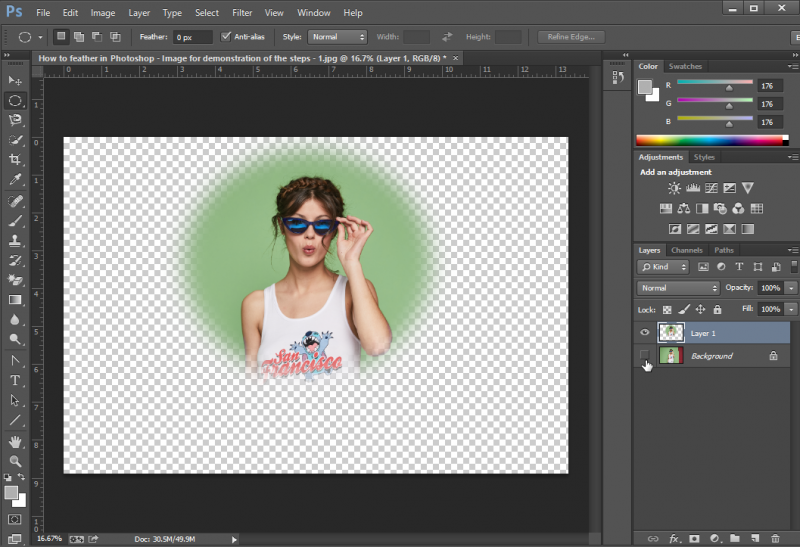
If you open the new Layer, y'all will be able to run into your selection with the feather outline. Your selection is at present ready to be combined with other images or to be used to create a new paradigm.
Stride 5: Use Terminal Changes
Once you accept learned how to feather in Photoshop, y'all can create interesting designs. To make your selection stand out, you can alter groundwork color or add a background image or a new layer underneath it.
We are going to create a new layer, and drag information technology nether the layer with selection in Layer Panel. With the new layer selected, get to Edit and click on Make full. Add the color or design of your option on the layer.
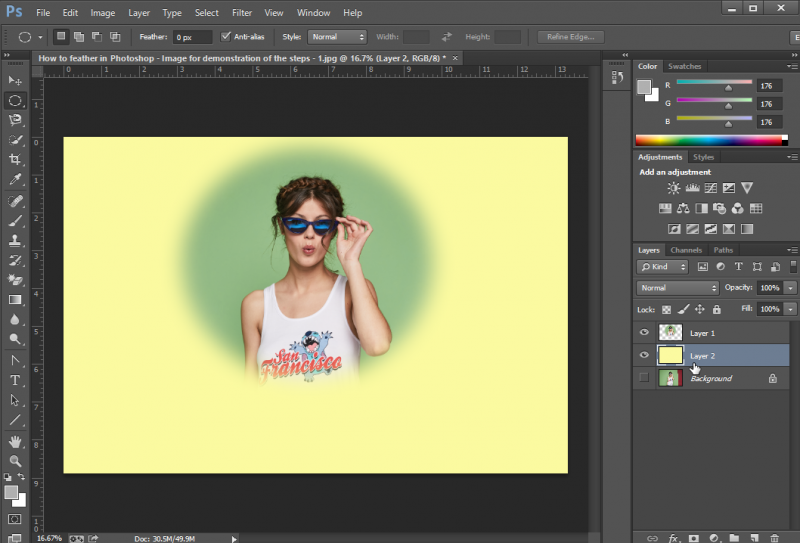
Now y'all would be able to clearly encounter the plumage event on the selection. Nosotros hope now you lot know how to feather in Photoshop.
Where Can Y'all Use the Feather Effect in Photoshop?
We hope you lot had fun learning how to feather in Photoshop. Yous tin can experiment with different Feather values. It would have some practise to make your selections fit naturally into your designs. But it is not very difficult, and you will shortly get the hang of it.
Now permit'south take a look at how you lot tin combine different images using this technique. Nosotros take 2 images that are shown below, and we are going to put them both together to create a new blueprint.

The next step is to use the Lasso tool to closely select the part of each prototype. Once you accept selected a portion, you can proceed to apply the feather effect, following the aforementioned steps given above. Paste your selections on a new layer.
You lot tin can add the groundwork of your choice. You can also utilize the 3rd image, and add the selections from two images on it. Once your edges are feathered, y'all are free to do whatever you please with your selections.
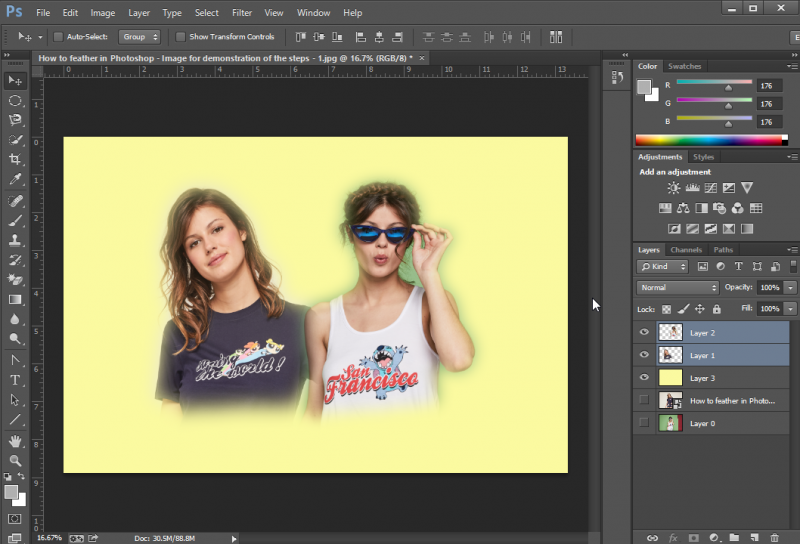
This is what our final prototype looks like. As you can see, the edges on both images look quite soft. It as well becomes easy to make compositions in Photoshop with this technique.
There is much more y'all tin can do one time yous learn how to plumage in Photoshop. You can use it to extract a function of the image, or make compositions, or create illustrations.
This is a great way to combine two images without any harsh edges It can also hide any imperfections in the selections.
And so go on practicing and trying new things on Photoshop.
Final Verdict
Feathering selections is something that is used widely in Photoshop. If you are learning Photoshop, this skill volition show to be quite useful in the futurity. There is much you can exercise if yous know how to feather in Photoshop.
In this tutorial, nosotros saw what it actually means to smooth edges in Photoshop. Then nosotros provided you with an easy guide to assistance you learn how to refine edges and selections. We likewise took a look at where y'all can utilise this play a joke on.
If you are a beginner y'all demand to remember it takes some exercise to fully grasp it. But there is nada you cannot achieve if yous set your heed to it. In one case you acquire how to blur the background in Photoshop, you can experiment farther.
We hope this tutorial was helpful to you. Let us know what you retrieve about this tutorial, and how do you use the feathering effect in Photoshop?
And then keep practicing and trying new things on Photoshop. As well, yous tin can notice clipping path service providers to go your task done.
How to Create a Clipping Mask in Photoshop?
Source: https://www.offshoreclippingpath.com/how-to-feather-in-photoshop/
Posted by: stoutinges1969.blogspot.com
0 Response to "How To Do A Feather Edge In Photoshop"
Post a Comment